
This article was originally published in Underwater Speleology in the May/June 2005 issue. I find that more than 15 years later this configuration is still very flexible, even when not used in warm water! Below are the original text and photos from that article.
A Minimalist Approach
Jason Richards NSS 41539

For years, I had been trying to find the bare minimum level of equipment I needed to successfully dive sumps located far back into dry caves. The primary reason was to reduce the workload for the folks who volunteered (or got suckered into) carrying gear back to the water. Concurrently, Mike Tennant and I were cruising the rivers of north florida in borrowed canoes, trying to find every little (and I do mean little) crack that might possibly lead to virgin passage. Often this meant having tanks as small as possible that were easily removable. In addition, we found that during the course of a day on the river, we would don and doff our equipment ten to fifteen times- a tedious and tiring affair with the normal cave equipment- not to mention having to haul the equipment and ourselves in and out of the boat repeatedly. We quickly realized that the equipment needed for both situations would be very similar.
If you haven’t figured this out by looking at the accompanying photographs, this is a side-mount type of diving rig. Though I have never condoned caving for pay, I do suggest that you make friends with some sidemount cavers and learn the ropes in a normal type of sidemount rig before moving into this particular equipment setup. There are some hazards and accompanying procedures that are particular to sidemount caving- many of which the self-taught sidemount caver might not figure out in time to live through the experience. In addition, the size and ease of movement of this configuration may lead a new caver to explore places smaller than they are really prepared for. Always try new configurations in a familiar place- There are almost always small places to try out your new rig in the front of your favorite dive sites.

So- with all of the warnings and such business out of the way, lets start with the equipment. The key to this configuration is that there is no buoyancy compensation device built in. Obviously, this provides some limitations. First and foremost, the type and size of tank that will work are obviously limited. In addition, the type of exposure protection that can be worn will also be affected. There must also be some thought given to environmental considerations. It would probably not be wise to proceed across a gaping abyss of unknown depth to find that you were not quite as buoyant as you thought- nor would it be particularly astute to traverse a low silty passage if there was any question about your ability to keep from making contact with the floor. A balance must be struck between your personal buoyancy, the amount of exposure protection you wear, the type of tanks that you choose to use, and possibly the amount of weight you may have to add to the equipment. As an example, Mike and I both found that wearing a 7mm full wetsuit provided just enough buoyancy for us to use aluminum 40 tanks. At full inhalation, we were capable of staying neutrally buoyant when the tanks were full. By varying how deeply we inhaled an exhaled, we could stay neutral throughout almost the entire range of gas pressure, becoming slightly positively buoyant for the last 500 pounds of pressure. Of course, depth plays a major part in your buoyancy as well. I found that below 70 feet I was too negative and could not stay off the bottom without constantly moving. But as my tank pressure was reduced, I was able to stay neutral at deeper depths. As another example, Chrissy has found that she can wear 40s and a 3mm full wetsuit and still remain neutrally buoyant to about 60 feet. If you are testing this out for the first time, I would suggest that you try for a balance that makes you neutral at the surface with your lungs partially inflated. This allows you some lung volume to compensate for buoyancy loss due to compression of your wetsuit, but should keep you from becoming overly bouyant at the end of the dive. If you find that you are too positive at the end of your dives, turn your dive earlier, leaving more gas in the tanks, rather than add weight to the rig, which will reduce the depth you can safely go to, and negatively affect your ability to maintain neutral buoyancy with your lungs alone.
Once you remove the wing and drysuit a whole host of equipment may be disposed of. First, all of the inflator hoses should be removed from the first stages. This makes taking the tanks on and off in the water easier, with fewer hoses to deal with. Since there is no bladder, we can get rid of the entire harness assembly. There is no reason to use it as the essential components, the belt and the bungee, will be retained. We are reduced to the two basic items, the weight belt (or in this case, the equipment and tank belt) and the bungee.
The bungee is no more than a loop of 1/8th or 3/16th inch bungee cord. The thicker ¼” bungee seems to be common, but is not recommended- it is too stiff and most people will find that it does not stretch enough to comfortably wrap around the valves. The 1/8th inch may be too thin for some, and it will stretch permanently if used to carry the tanks out of the water. The bungee is tied into a barrel knot. The barrel knot can be adjusted to get a correct length if the loop is tied too large. I would suggest that you use zipties on the adjusting side of the knot if you must separate the two halves of the knot. This will prevent the loop from inadvertently loosening during the dive, or more likely while walking tanks too or from the water. Once the loop has been finished, make a half twist and put one arm through each loop, centering the knot in the middle of the back.

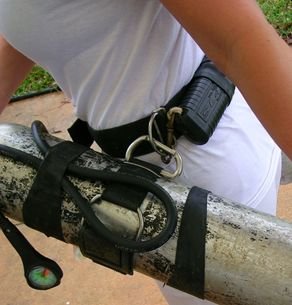
Next is the equipment and tank belt. This is no more than a standard weight belt- trimmed to the correct length with three d-rings and some tire innertube to hold things in place. The two side D-rings, which will eventually hold the tanks and lights, are both low profile type D-rings, available from Dive Rite. They should be placed just behind (or above if you were laying on the ground) the centerline of the body. The single D-ring in the back is a standard size D-ring. All of the equipment carried will be secured from these three D-rings. Low profile D-rings are very important to the in water characteristics of this setup. As with any sidemount setup, it is essential that the tanks be parallel with, and on the same plane as, the centerline of the body. By using a D-ring and mini-carabiner connection, any slack is immediately removed as the tank valve is rotated upwards into the armpit. In contrast, attaching a bolt snap to the tank using a length of line produces at least as much room for movement as the length of the snap, plus any additional length caused by the line. This can be compensated for by moving the side d-rings towards the center of the back, but this makes the snaps even harder to reach to connect or disconnect, and in addition, lessens the amount of room on the belt, useful for storing lights and other items. In the picture at left, Chrissy shows how easy this system is to use, by connecting the tank without even touching the connectors. This does present a metal to metal connection, but without a harness, it is easier to remove the tank by releasing or cutting the weight belt, than it would be to cut any sort of tank strap in such an awkward location.

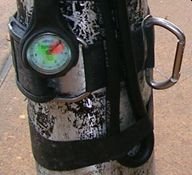
The only part remaining is the carabiner mounted on the tanks. Because of the extra slack mentioned above, I use reduced size stainless steel carabiners with a keylock gate, rather than a notched gate. The smaller size of the carabiner ensures a snug fit between the body and the tank, and keylock gates allow the carabiner to be removed from the d-ring easily, without the d-ring catching in the notch. The full stainless construction prevents the corrosion commonly seen on aluminum carabiners after long exposures to tannic water.

The biners are attached to the tanks using short length cam bands. The new stainless steel cam bands available from Dive Rite may change your relative buoyancy, so you will need to decide if they will be appropriate for your buoyancy. The bands should be attached to the tank so that the cam mechanism is towards the back, or away from the floor in a normal diving position. This presents a nearly smooth surface on the bottom side of the tank. There is some variation of thought as to the orientation of the valve and first stage, but I have found that with the valves placed outwards and the first stages in my armpit, the valves are much easier to manipulate without painful wrist contortions and the first stages are readily inspectable and protected from impact. It would be extremely difficult to roll off a valve in this configuration- you would have to grind one arm to a nub before the cave would make contact with your tank valve.
A word about lights and other gear. In these pictures you see two SL4 lights. In this setup, one of them is my primary, in its stored position, and the other is a backup. My second backup is a small mask light. For the types of dives that this rig is designed for (short duration, small caves) there is no reason to carry a bulky canister light. Some people have found that smaller 4 AA lights are completely adequate, as well as requiring less room on the equipment belt. In addition, you should carry a knife of some sort. A typical small sheath knife fits very comfortably tucked underneath one of the tanks. I typically wear mine on my gauge strap, as I hate trying to get the knife back in the sheath on my waist when I am buried in mud, silt or bottom gravel. As for reels, I usually carry a small jump reel and a primary reel- In most small caves, the jump reel is long enough to make the primary tie-off if there is any line at all- leaving me the primary reel (300-400 feet of line) to patch line breaks, continue exploration or whatever. The last and most important piece of gear is the neck loop. Here you can that C has both of her regulators attached to my neck loop, which is a bit too large for her. The neck loop should be almost snug to your neck. Each regulator has a breakaway bungee with a small bolt snap attached to it. This keeps the second stages out of the silt, and allows for one handed reg changes, should your other hand be busy with the reel or something else.

As you can see, this is a very simple rig to construct, but the real difficulty is in learning to control your buoyancy within the depth and gas limitations without the use of an independent buoyancy control device. You will be amazed at how easy it is to swim this rig- It is almost as easy as freediving. Have fun playing with a new configuration, and as always- please care for the caves.
A note from 15 years in the future. The cam band placement in this configuration is much higher than is used now for sidemount tanks. The reason for this is the high placement of the waist belt. As there is no crotch strap or back strap to fix the vertical positioning of the waist belt, it will be higher than is normally seen on a sidemount harness. The tank cam bands must move up accordingly. This does mean that the tanks may tend to tilt upwards at the end of the dive, but some compromises are made for a diving rig you can hold in one hand. A word on carabiners. Most people will try to use their sidemount clips for this rig, but it won’t work well. The length of the clip, and it’s attachment, will allow too much movement of the tank, necessitating extra d rings or sliding d-rings, or other silly fixes. The carabiners allow the tank to rotate about 30 degrees, and since only 30s or 40s (or smaller) are appropriate, this movement will normally be within the thickness of the diver, and not cause a problem.